Showing posts with label recipes. Show all posts

1/27/12

Sesame Honey Candies

As I sit here typing, I'm having to lick the yummy sweetness from the Sesame Honey Candies I just made, off my fingers!

OK, if you want a health, nutritious and WAY YUMMY snack, this is about as easy as it gets.

Originally from Greece, these tasty little pieces of heaven have always been a favorite of my kids. Now we are going to be making them regularly. In addition to the yum factor, these guys really are healthy. If you can limit yourself.

Sesame Honey Candies

1 cup sesame seeds
1/3 cup honey
small pinch of salt
Olive oil

Line a cookie sheet with foil or parchment paper. I also oiled my foil for easier removal.

Toast the sesame seeds in a large pan until they are nicely browned. They will dance around in the pan a little, so higher sides are better! Sprinkle your pinch of salt over the sesame seeds and then pour your honey in. It will do it's own dance because the seeds and pan are hot. Stir consistently for 1 minute. Removed from heat and pour onto your oiled foil.

Remember - this is like working with sugar and it gets EXTREMELY hot. Let it cool a bit and then score with an oiled knife into what ever shape you like. I did mine in small rectangles. Let cool completely before you eat. You can store these in an airtight container. Yeah, right. Like there will be any left to store.

Now on to make some to send off to my oldest! Enjoy!!

11/26/11

Leftover Turkey Stuffing Cups

Leftovers. I always try to do something a little different with leftovers but nothing I can think of is quite so simple as well as so much fun as turkey stuffing cups. 

I wish I had a photo of them, but being on the road, not only do we not have leftovers, I don't have any photos of last years dinner!

Hopefully, you can imagine what these look like as I give you some directions. 

These measurements are approximate. Use what you have.
Mix 3-4 c. mashed potatoes with 2 beaten eggs
Add 4-5 c. stuffing/dressing,
1-2 c. small diced or shredded turkey
1-2 c. gravy, start with less and add more as needed
1/2 c. craisins, optional
Mix all this together with a large spoon until all ingredients are well incorporated. It should be pretty moist.
Here's the fun part: you're going to take your muffin pans out and spray each cup well with non-stick spray. grab a handful of the mix, shape it into a ball and gently place it in the cup. Do so with all the leftover mix. 

Bake at 350 for 30-45 minutes, until a thermometer inserted in the center reaches 170 degrees.

Serve hot with a side of cranberry sauce and extra gravy if you have some. This is such a huge hit in our home that we plan for extras! I make enough to freeze some to enjoy through the Christmas season as an easy dinner.

Give them a try and let me know what you think. Any other leftover suggestions?

11/10/11

Homemade Almond Milk - Easy

We are pretty much a family with food allergies. Dairy is one of them. I found out when I was pregnant with our youngest when I had allergy testing done. I knew something wasn't right but had been blaming it on bread. Turns out dairy is in lots of stuff. Bread included. I do love my cheeses though, so on occasion, I'll use some of the good stuff in my food. Butter doesn't seem to affect us as much, so that is our cheat.

Anyway ... milk is off the table. Even goat milk. So, I turned to the first alternative that is readily available: soy. I knew there had to be something better out there and so started trying other milks. Tried rice milk - too watery. Coconut milk was yummy good, until I realized it upset my stomach as well. Oh the pain! Weird too, because I can use coconut milk for cooking, so my guess is that the daily milk was too much. And then I found almond milk. Yummy, satisfying and no issues with my tummy as well. So, now the boys and I are drinking almond milk, but it can get pricey. I've decided to give it a try on my own - it's almonds for goodness sake, how hard can it really be?

Turns out, it's not. It's actually really easy in fact. Here's the process:

Soak 1-2 cups RAW almonds in 4 cups water and 1 tablespoon salt for 4-8 hours. This will remove any bitterness from the skins. The more almonds, the richer and creamier the milk will be.
I have no idea why Blogger wont adjust the orientation of this picture...
Strain and rinse the almonds.

Place the nuts in your blender (mine is big and strong so I do them all at once. You may need to do batches) along with 4 cups of water, 1 Tablespoon vanilla and 2 Tablespoons sugar/sucanut (both are optional). BLEND on high for 1-2 minutes. Really, the time depends on the blender. Taste and add more vanilla or sugar if needed.

Let sit for 5 minutes. Give a quick blend for 20 seconds.
Strain through a strainer lined with cheesecloth. When it is done dripping, I gather the corners and then give it a good squeeze to get the liquids out - I do this into a 4 cup measuring cup and then pour into my container for the fridge.
Ended up with almost 4 cups after straining and squeezing

That's it. Easy! Now don't go and throw those grounds away. I'll be posting a recipe and photos soon, but I've made almond cookies with the pulp as well as added it to bread dough too. I've tried to make crackers but can't get them to stay together ... still tastes amazing but not a cracker.

Enjoy your new found hobby that is healthy and nutritious.

11/4/11

Pickled Dilly Beans Recipe

Side dish time: Pickled Dilly Beans

This one is easy, easy, E-A-S-Y, easy.
10 minutes but takes a minimum of 2 days before you should use it, but no canning required.

Take 1/2 pound string beans, wash and trim the ends.
Pack tightly in a 1 quart canning jar.
Add in 2 whole, peeled cloves of garlic, a couple small slices of onion and 2-4 springs of fresh dill.
Add on top 3 tsps of salt, 1 Tbls sugar and 5 peppercorns.

Next, heat 3/4 c. water and 3/4c. vinegar to boiling, and pour on top to fill the jar. Yes, your house will smell for a bit, but remember, vinegar is also a good odor neutralizer.

Here's the hard part: put a cover over it, put it in the fridge and wait. I know it will be hard, but if you can wait 2 days. Longer, up to 6 weeks, will give it the most flavor.

We had this as a side to meatloaf and mashed potatoes.

Other options to try instead of or in addition to the dill: lemon zest strips; red pepper flakes or jalapeno slices.

What do you like to pickle?

10/28/11

Calzone Time and Kale

Having a minuscule kitchen means things have to be easy. That is why I've been sharing recipes with you every week or so on easy AND healthy recipes.We've been hearing and reading more about Kale lately with all of it's health properties including being a big anti-inflammatory, that we've had to find a way to add more of it into our diet.

Dr. Oz calls it King Kale for all it's anti cancer properties. 

So we tried some of the Kale chips we've been reading about. Warning: this is so easy, your kids can do it and will eat it without much of a fuss.

Take 1 bunch of Kale, preferably organic. Wash and dry it. Cut or tear it into small pieces off of the hard stem.

Place the kale in a bowl or bag and drizzle about a tablespoon of olive oil over it and spread it on a baking sheet.

Take a pinch of fine sea salt and sprinkle it over the top.
Put it in the oven at 200-250 for approx 20 minutes. It should be crisp and crunchy.OK, maybe it doesn't look so pretty, but it tastes good and given it's health benefits, you'll want to eat a plateful.

Today's recipe is for Italian Calzones.

Kind of like a wrapped up pizza, I haven't made these in years and wanted to try something else to put some kale in that would be simple, simple, simple.

Dough
1 1/2 c. flour
1/2 c. water, warm
1 tsp. yeast
2 tsp. sugar
1/2 tsp. salt

Combine above ingredients, let sit in a warm location for 30 minutes (I have put my bread bowl above the coffee maker in the am). Once it has risen, you will take it out and divide in half and press /squeeze out all the air bubbles out.
Now let it rest for 5 minutes. Go and do the rest - we'll come back, I promise!

Filling
OK, this can really be ANYTHING you want, but here's what I used:
1/2 lb. ground pork
1 - 1 1/2 c. spaghetti sauce
1 tsp. chopped garlic
2-3 Tbls. dried, ground kale
1 Tbls. parsley
1 tsp. celery salt

Shredded Cheese - I used Edam, because that is what I had on hand, but my first choice would have been mozzarella.
Cook sausage completely. Add in next 5 ingredients and as soon as it comes to a low simmer, remove it from the heat. OK was that easy, or what?

Now, back to the dough. Take one of the two halves and flatten it out onto a flat surface. I used a couple tablespoons of flour on my board as I started out. Once it was coming into shape, I tossed a little cornmeal on my base so it would have an additional texture.

Almost ready!

From here you will make sure the dough is as flat as you can make it. Use your finger tips to dimple it continue to stretch the dough. If it tears, don't worry, just pull it back together and press.

When you have it to your desired thinness, take half the filling mixture and place it on one half of the dough. Add as much cheese as desired.

Now is actually the hardest part: folding and crimping. Even this though is fun which in turn makes it easier.  Grab the back half of the dough that doesn't have any filling on it and pull it over the top. All you are going to do is "roll" a little bit of the dough over itself and push it down onto itself. Gives a little crimped edge look.


When you're done it should look something like this:
Place it on your baking sheet. Next, repeat with the 2nd dough. Now, it is really, really, really important to take your fork and poke the top so the steam has somewhere to go. Otherwise you'll ended up with an extra airspace like this:
Not a huge deal - it is what it is and it still tasted great. The boys ate theirs not knowing how easy or just how good it was for them.

I hope you enjoy this one. Working on a couple more ideas for Kale. Have you tried it before and if so, how did you make it appealing?

10/14/11

Super Easy Chocolate Mocha Mousse

This is one you will want to make tonight for dessert - and it's easy enough that you'll wonder where this recipe has been.

Literally, I scrounged around the camper looking for chocolate this time. I've made this with Hershey's bars, bulk milk chocolate from the health food store and this time, with Dove dark chocolates that I found at  the back of the cabinet (don't worry, they were still good).

Ingredients
1 pkg chocolates or 2-3 full size chocolate bars
1 - 2 tsp instant coffee OR 2 Tbl strong coffee, optional
2 Tbl water
2 egg yolks
1 c. half and half
8 oz. Cool Whip or whipping cream
1 graham cracker pie shell

Directions
Unwrap 1 package of Dove chocolates and put them in a bowl over a pot with about 1 cup water on a simmer (this is my homemade double boiler system).

Stir the chocolates consistently.

While the chocolates are melting, mix 1 teaspoon instant coffee with 2 tablespoons water OR 2 tablespoons strong coffee. If you don't want the mocha flavor, skip this all together.
I had some leftover Taster's Choice samples, so this worked well for me


Separate 2 eggs yolks, discard whites or use for another purpose (like yummy meringues). Once all the chocolates are melted and smooth, now is the time to add the egg yolks. Stir immediately and constantly for 1 minute and don't forget to scrape the sides of the bowl. The eggs will cook into the chocolate if you keep your arm moving swiftly. Don't do this step and you'll end up with scrambled eggs in your chocolate.

Next, pour in the coffee. It will start to thicken pretty quickly. Remove from heat.

Add your 1 cup of half and half, stir until color is smooth.

Lastly, add in 1 - 8 oz. tub of Cool Whip. OK, this is one option - you can also grab some whipping cream and make up 8 ounces of the fresh stuff. No judgment here - I wanted easy this time. Stir until color is smooth again.

From here you have a couple choices. You can simply pour it all into a pre-made graham cracker pie crust, pour it into individual serving bowls or, as my guys are always wanting to do, eat it all directly from the bowl.

From start to finish this recipe will take you about 15-20 minutes - the first time. It gets easier the more you make it.

10/7/11

Cottage Cheese Pancakes

I know - sounds weird, right? These are the best pancakes I've made yet - so say the guys. You know, my super picky eaters. I'm also trying to find some new ways to get more protein and less carbs in our diet. This was a great recipe for that alone. Even with our dairy sensitivities, we seem to do OK with small amounts of cottage cheese.


I was actually looking for a way to get rid of some leftover cottage cheese and found a recipe from Whole Foods that I just had to try. I did modify it a bit to suit what I had on hand, so I'm posting my recipe below. 
pancake pile
Photo credit rcstanley

Being picky eaters, I did NOT tell them what was in it. I just mentioned I wanted to try a new recipes and that alone brought out tears. Sheesh. 


Ingredients


1 cup flour (half unbleached, half whole wheat)
1/2 teaspoon baking soda
1/4 teaspoon salt
2 tablespoons sugar 3 eggs
1/2 cup cottage cheese
1/2 cup almond milk, vanilla flavor
2 tablespoons olive oil, extra light
Coconut oil for the pan


In a large bowl, stir together flour, baking soda, salt and sugar. In a separate bowl, whisk together eggs, cottage cheese, milk and oil. Add flour mixture to egg mixture and whisk until completely blended. It will look lumpy to those who don't know what's in it. That's OK - tell 'em, that's how it's supposed to be.

I use 1 teaspoon coconut oil for each pan of pancakes.Working in batches, form each pancake by spooning about 1/4 cup of the batter onto the skillet. Cook, flipping pancakes once, until golden brown on both sides and cooked through, about 5 minutes total. 


I offered this with whipped butter, Maple Cream and maple syrup (both from Paul Bunyan's, that I've been raving about lately) and they got to choose. I had mine with just the butter and really it was wonderful. 

You need to try this recipe! Let me know what you think.


4/14/11

Creamy, Double Meat Rigatoni


As I've said before, I like to experiment with food. I've also said that I win some and I loose some. I think that the more you experiment, the more you get a feel for what will go together and what won't. It just takes time, patience and a loving family. :-)

So here is a new one and I will post the ingredient list at the end. I had some lean, natural beef along with some of our pork in the freezer waiting to be used. Grabbed them both and straight from the deep freeze and plunked them into the pan on med-low with a lid. The lid not only helps keep the heat in, it keeps the moistness in the meat and from scorching as well. I check on it every 3-5 minutes and "scrape" off the cooked portions and flip the meat over. When about 3/4 of the meat is cooked, give it a teaspoon or so of some good seasoning salt. Time to start a pot of water for the Rigatoni.

Meat Tip #1: If you don't do this, you end up with a super large and thick hamburger patty. It actually cooks pretty quickly with this method, so rarely will I take ground meat out to defrost if I'm just going to be cooking ground meat.
 This makes for a lot of meat, which I will only be using about 1/3 of for this recipe. The rest, I'm going to save. Meat Tip #2: Save your meat and have a little less grease the easy way - put a folded paper towel in the bottom of your bowl and it will soak up a lot of the extra grease.


I drain the meat remaining in the pan. If you are very concerned with fat, here is Meat Tip #3: Take a wad of paper towel and wipe the pan with the meat in it and it will absorb more fat still. To the third of the meat I have left in the pan, I add 3/4 of a quart of tomatoes that had been canned with garlic and basil. I don't worry about draining this though. I want all the flavor from those liquids. I also add about 3/4 cup of frozen peas and carrots. If I had just peas, I would have used that, but the carrots did add a simple sweetness. Hopefully your water is now at a boil, so add some salt and your desired amount of noodles. Personally, I use half a box for 4 of us. Set your timer!
This does NOT show the full 3/4 of a quart of tomatoes
Here is the full tomatoes - you can see all the liquid.
Let this simmer on med to med-high. We want to reduce the liquid, while keeping the flavor and nutrients from the water. Don't think you'll miss much? Take a spoonful of the liquids and taste it....you'd miss it. Promise.

You're going to stir this mix every couple minutes - more as it thickens. What you want to get to is about this consistency (mine took about 12 minutes):
Now for the creamy. I used one half package of light cream cheese, break it into smaller pieces and place the chunks around in the sauce.

Let it melt for a minute or two and then stir. Is your mouth watering yet? YUM! Mine is again as I write this down. Noodles should be just about done - drain the noodles when your timer goes off and add your fabulous sauce.

Now it's time for eating. D decided to me my sampler. He's become more adventurous as the experiments have gotten better. That and the promise that if it's bad, he doesn't have to eat it.
Thumbs up from D-man.
Now for the ingredient list.
Creamy, Double Meat Rigatoni

1/3 lb ground beef
1/3 lb ground pork
Rigatoni - good quality
1 tsp. seasoning salt
3/4 c. peas (or peas and carrots)
3/4 qt. stewed tomatoes with garlic and basil (or add those later)
4 oz (1/2 package) cream cheese

Try it, you'll like it. Let me know what you think.

1/2/11

Cheesey, Italian Crock Pot Chicken and Resolution No. 3

New Year's Resolution number 3: Use crockpot more often!

Think about it. What other servant do we have that can help us so much in the kitchen? Yes, the dishwasher, oven and microwave are all great, but you have to spend more time with all of them than you do the almighty crockpot. Dump your food in, put the lid on (and LEAVE it on), come back in 4-8 hours and you've got a meal. Seriously.

And I have my mom's old crockpot from the 1970's. Still works great.

That's why it's number 3 on my list.

For those of you who know us, you may be surprised at this dish since it has so much dairy in it. But every once in a while we can have one of these meals and be OK. Everyday, and a few of here at the farm would be hating life, but once a week? We're OK. Here's the bonus - it takes minutes to prepare using your crockpot!

This is one of those really simple and super yummy dinners.
 Ingredients:
1 large jar spaghetti sauce
4 oz cream cheese
1 whole chicken breast
2 c. shredded mozzarella cheese
Penne pasta
Olive Oil
1 T. parsley
Red pepper flakes, if desired

Into the crockpot we go:
1 large jar spaghetti sauce - ours was canned tomatoes with garlic and basil in it from our garden.
1/2 box cream cheese
1 whole (or 2 halves) chicken breasts
Seriously, just dump them in, put the lid on and depending on how much time you have, set it on either low or high (I had less than 5 hours and the chicken was frozen, so it was high for me). Go enjoy life for a few hours.


Penne pasta
When time is getting close, I put a pot of water on and make about 1 cup COOKED pasta for each person (a small handful of dry pasta each).  Once water boils, add about 1 tsp of salt and pour the pasta in, stir and set your timer.


Move back over to the crockpot. Remove the lid and with two forks, break up your chicken a bit. The kids like theirs shredded quite a bit, me not as much.

Get your bowls out and get a strainer for the pasta. When your noodles are done strain and then pour a couple swirls of Olive Oil around and stir or just grab some of the sauce from the crockpot.


Grab a couple scoops and put them in a bowl, top with the chicken mixture and a few pinches of the mozza cheese.

OK, this is where you can get a little more adventurous. I like mine with some heat! I sprinkle on some red pepper flakes and parsley. Chelsea likes it with her hot sauce. Scott and I, a little extra garlic. Get creative and everyone gets there own. I will say that I put my bowl under the broiler for about 2 minutes to lightly brown the cheese.

This goes great with a simple green salad with Italian dressing and French bread. Yummy!

Do you own a crockpot? How often do you use it?

12/31/10

Yummy and Healthy Meatloaf - Resolution No. 1

Resolution number 1. Eat healthier this year. Yes, we get our own eggs and meats, but it's more than that. Less "junk" food and more greens ... you know those things - fruits and veggies. But how?

Here is one of those old fashioned family favorites. Add some creamy mashed potatoes (or this year, maybe creamy sweet potato/cauliflower mix) and it's comfort food through and through.

But it's not one of those food that you think of when you think of the word healthy. Personally, if you like meat, I think this is one of the more healthy versions by using Beefalo and spinach. 

Corinne's Farm-style Meatloaf

2 lbs. ground Beefalo
1 lb. ground pork 
2 eggs

1 1/2-2c. Panko bread crumbs (can use regular, but I like these)
1T. herbs de providence (good use for left over lavender)
1 T. parsley
2 tsp. chives
1-2 tsp. onion powder

1 tsp garlic salt
1/2 tsp. pepper

and my secret ingredient they boys see, but call herbs ...
1/2 box of frozen spinach, thawed and drained


Now quick, go start your oven to 350. I don't worry about "preheating" for this, just turn it on now.
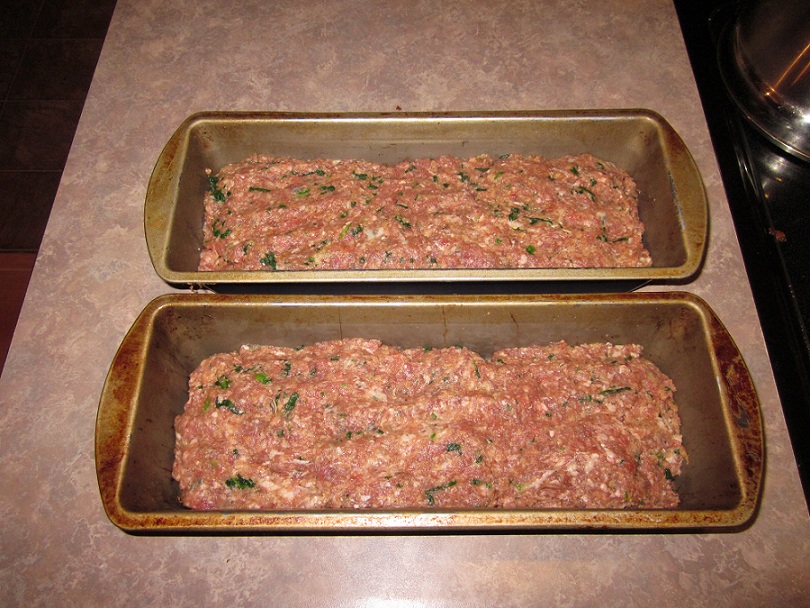
Take your rings off for this one folks - dig in and smoosh it all together with your fingers. I used to use the food processor, but it does make it tougher and is one more tool to clean. Think of it as PlayDoh. :-) Remember how much fun that was? I loved it. And yes, this reminds me of playing with the stuff. All you are going to do is incorporate everything evenly until it looks like this:
Pretty, huh?
I then take out my 2 long, skinny bread pans, separate it into halves and there you go...
Yes, they are old, well loved pans. The aren't pretty, but they get the job done. For the most part. Anyway,
Pop them into the oven for approx 35-40 minutes or until a meat thermometer reads 160.

What would meatloaf be without a sauce on top? Well, mine is a little different again. Would you expect anything less? I don't have an exact measurement, but it is approximately 1/2 cup ketchup to 1/4 cup sweet chili sauce (the Asian version). That's it. Mix it up, pull your meatloaf out at 30 minutes to spread a little on top and check it's temperature. Here is mine done. Not a lot of sauce as you can see.
 Notice what else is missing? I don't know if you can see it in the picture or not, but there aren't the pockets of grease or even shrinkage of the meatloaf. Lean stuff! I'm going to do a photo blog of our bacon one of these days - it is NOTHING, and I mean NOTHING like the stuff you buy in the stores. Even the high end stuff. But I digress - this is a lean, healthy version of one of my old fashioned favorites. Add some mashed potatoes and maybe some green beans and you've got a comfort meal worthy of sharing with company.  Bonus: you might have enough left over for meatloaf sandwiches tomorrow. Happy eating!

Comments? Suggestions? What are some of your favorite comfort foods?

12/27/10

Walnuts: Farm Made Treats

Walnuts are an amazing health food.  Walnuts are one of the best plant sources of protein. Nuts in general are high in plant sterols and omega 3 fatty acids (the good fats) that have been shown to lower LDL cholesterol. Walnuts, in particular, have significantly higher amounts of omega 3 fatty acids when compared to other nuts.

Today I made candied walnuts (and almonds & peanuts too). I've had them by themselves, in trail mixes and sprinkled on salads - which is my favorite way! I thought after making that caramel corn earlier this week that I would give it a try and make some candied walnuts. So here is what I came up with...


1/2 c. water
1 c. sugar
1/4 t. salt, Kosher preferred - omit if salted nuts
2-3 c. walnuts, almonds  or peanuts
Preheat oven to 100 degrees.

Melt water and sugar in pot. Once melted continue to cook over med-high heat for 3 minutes (until boiling). Stir constantly so it doesn't burn.

Put the walnuts in a large bowl and drizzle the syrup over a few tablespoons at a time and stir, stir, stir. The nuts need to be pretty well coated with the syrup mixture. Set them aside on a baking sheet or roasting pan lined with either parchment or wax paper. Put the rest of them on the baking sheet and put them in the oven. And turn the oven off. The residual heat will do the rest.

Set your timer for 10 minutes and take them out, stir them up and then flatten them so they are in a single layer. Let it cool enough that you will not burn your tongue and then try one. You now have a healthier treat instead of plain sugary candy.

Now give my salad a try ...

Mixed baby greens
Crumbled blue cheese
Crumbled bacon
Craisins and / or chopped apples
Candied walnuts
Citrus dressing - I like to make my own from orange juice, a little squeeze of lime, canola oil, salt and honey. Nope, no recipe. Each time it comes out a little different, but I always do it to taste.

Do you like nuts? What is your favorite recipe/food/way to eat nuts?

12/24/10

Farm made Christmas Gifts

Tomorrow is Christmas! I am so excited - almost as much as the kids. One of the things I so enjoy doing is making special treats. No, not fruit cake (although I have had some amazing homemade fruitcakes before), but treats everyone will enjoy. When one of our friends brought caramel corn to our weekly Family Life group, I knew exactly what I was going to do with all that organic popcorn we got earlier this year. Here is my version of Kristi's Caramel Corn.

1c. organic popcorn kernels, popped
1 1/2 c. organic butter
3 c. brown sugar
1 c. light corn syrup
1 1/2 t. salt, Kosher preferred
1 T. real vanilla, or the seeds from inside 1 vanilla pod
2 t. baking soda
1 c. roasted, salted peanuts

Preheat oven to 250 degrees.

Melt butter,sugar and syrup in pot. Once melted continue to cook over med-high heat for 5 minutes (until boiling). Stir constantly so it doesn't burn. Remove from heat and add in soda and vanilla. It will foam a bit and "grow", but keep stirring - about 2 minutes. 

Start with the peanuts if your adding them in. Put them in a large bowl and drizzle the syrup over (approximately 1/4 cup) and stir, stir, stir. The nuts need to be mostly coated with the syrup. Set them aside on a baking sheet or roasting pan. Add 1/4 of the popcorn in the large bowl and drizzle 1/4 of the remaining syrup over the popcorn and again stir, stir, stir. Put it on the baking sheet and repeat. You will want to have a few pans to go in the oven as it makes the next step easier.

Set your timer for 15 minutes and take your pan out and stir. Mix up the popcorn and pop it back in the oven. Do this 3 more times (for a total of an hour in the oven) stirring each time. Remove from the oven the final time, mix the nuts in and let cool.

I put the popcorn in clear cellophane plastic bags and tied with a festive ribbon. If you are not bagging it up, don't expect for it to last long. My boys will go through a bucket of this stuff in no time flat!

What is your favorite Christmas treat? Enjoy the rest of your evening and Merry Christmas from Willows Edge Farm and the Logan home.

12/22/10

Easy Dinner Tater Tot Casserole

Here's a quick, easy and most importantly, tasty dinner. Because of family food allergies to MSG, we do things a little different around here. So here is my Tater Tot Casserole using our own pork and chicken noodle soup ( much more affordable version) instead of ground beef and cream of ... soup.

1/2 lb. ground pork
1/4 c. flour
1 can chicken noodle soup without MSG
Ingredients
1/2 can whole milk (or half and half)

1 c. shredded white cheddar cheese
1T. parsley
1/2 t. chives
1/4 t. celery salt
1/8 t. paprika
 1/2 bag tater tots
2 fresh eggs, beaten
optional, french fried onions
Side: Green beans

Brown ground pork, and if excess fat, drain off. Move off heat and sprinkle with the flour and stir until all pork is covered. Pour in chicken noodle soup, milk, cheddar cheese and herbs and put back over heat. As it starts to simmer, you will see it thicken. Stir it occasionally so it doesn't stick and burn.

Using an 8" x 8" pan, fill the bottom with the tater tots - pretty much half a standard bag. The tots can be frozen or thawed - it's a small dish and cooks well.  Break the eggs into a cup or bowl and scramble well and then pour over the potatoes and mix. Now take your pan with the mix and pour it over the tot & egg mixture. If desired, you can add french fried onions. We love them in our family.


Bake at 325 for 45-50 minutes.
We served it this time with some green bean that we froze from this summer.


Here it is, ready to eat ... I couldn't get the picture soon enough. Everyone was ready to eat!


All the ingredients that are bold in the list are things that we grew here at Willows Edge Farm this last year.