Last week I told you about how I had started back again making our own bread, but don't think I told you why.
Bread is one of those staples of life. No matter how old the book, you will find references to it. It can be life giving. It can also give us comfort and familiarity. On the other side, it can cost a small fortune for the good stuff and taste like chemicals on the cheap side. And that is what happened to me. Although, I will say, it wasn't cheap, but gosh, it tasted absolutely terrible! I could taste the chemical they use in the production. YUK! That was the last loaf of bread I bought.
So, in researching for my bread recipe, I did find a couple website and recipes who claimed "easy", "fast" and "no-knead" for a bread recipe. I ended up with a variation of my own that has been working so well, I seem be going through making a batch a day.
Before you go saying something like, "well, she's got plenty of time to do that", well, yes I have time, but no, I don't need it and if you remember my post from a while back, my "kitchen" is tiny. I'll post the recipe first and then go into directions. So, here goes:
* 1 1/4 cup warm water (think bath tub warm)
* 1 teaspoon reg salt OR 3/4 Tablespoon Kosher salt (latter is my preference)
* 1 Tablespoon oil. I've been using coconut oil, but you can use anything. Healthy that is.
* 1 Tablespoon heaping of honey (go local - it's better for you)
* 1/4 teaspoon yeast. Yep, you read that right! 1/4 of a teaspoon. That means each yeast packet that has 2 1/4 teaspoons actually makes me (and now you) 9 - NINE - loaves of bread instead of just one.
* 3 cups of flour - I used a mix of white and wheat. Sometimes more white, others more wheat, but I try to stick with a minimum of half wheat these days. More on the wheat at the end ...
That, my dear friend, is it!
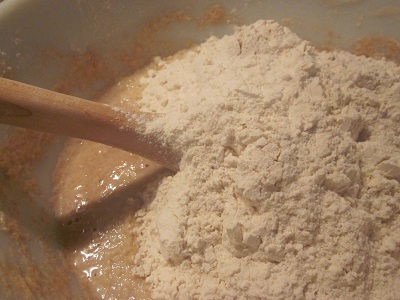
Warm that water up and pour it in a bowl. Add in the oil (first and the honey will slide on out), honey, salt and 1 cup of flour and give a QUICK stir. Then add in your 1/4 teaspoon of yeast and the rest of the flour. This is what it will look like now -
Here's a better close up
Yes, that is a wooden spoon you see in there. How else did you think it was going to get mixed up? Oh that's right, I used to talk about my stand mixer a lot. Well, it was far too big for my little kitchen, so it is packed and, I'm sure, anxiously awaiting my use again. Anyway, mix it up. Yep, just that simple. This is what it will look like:
No, it is not at all what you were thinking it would be, huh? I've made the traditional bread before and that looks all smooth and soft. This looks like a big blob. Yes, this really is how I leave it. If it is too dry, you can add a couple tablespoons of water at a time. I had to with this batch. It's OK, a
little extra water will make it moist. Too dry and it's going to be too tough.
Oops, I forgot - give it a blanket before you put it to bed. I put the plastic wrap on and then a towel (if I remember):
Now is the hard part: Leave it alone for at least 10 hours, or overnight is preferred. This is not, I repeat not going to double in size. It is much too conservative and self away to have to puff itself up like the other stuff. When it's time, a sprinkle out a little flour on the cutting board and turn the dough out onto it. Like this:

Then I'll wet my hands - I know, you're thinking, "WHAT? WATER?" - but it does just fine in helping to keep the bread from going too dry from the extra flour and from sticking to my hands while I'm turning it around a bit. I will grab at the edge of the dough, and bring them in towards the center. I am NOT kneading, but rather just trying to give it some shape. Let's face it, would you want to eat something that looked like that blob above? In all, I am going to spend about 2 minutes "shaping" this loaf, that's it. Then I will put a few teaspoons of olive oil in the bottom of my bread pan and plop in the dough. If I'm feeling creative, I'll give the bread some cuts so it will expand where I want it to expand.

I'll cover it again with the plastic wrap and let it sit for about an hour or so. I've been putting mine directly into the oven with the pilot light on. It will rise in there nicely in that hour. IF you have a gas oven, make sure you take the loaf out of the oven between the pilot light stage and turning it all the way on to 400. Bake at 400 for about 15 - 20 minutes. A little more if your bread has been on the counter at room temperature. You will have this absolutely wonderful bread that you and your family will enjoy.
 |
| It does rise a bit more and this is out of the oven |
If, and that is a big
IF, there are leftovers, we ended up cutting them up, pouring a little butter over them and then sprinkling with parsley, garlic powder and celery salt. Forget the salad - this is a treat all in itself.
 |
| Admit it, you want to try it now |
OK, I said "more on wheat at the end". Here's my thought on wheat vs white. We've been programmed to think white is softer, fluffier, tastier. On the contrary my friend! Not only does it taste better and have a better texture, it's good for you. But, I do have kids and understand the whole white/wheat controversy there, so ... with 3 cups of flour, I started with 2 3/4 cups of white and 1/4 wheat. We're up to 1 1/2 of each and sometimes I'll even just do 1 cup of white. Guess what? Yes, they do notice! They notice that their bread with a little butter and maybe a little extra honey or the amazing
maple cream (that I talked about in a prior post) tastes even better with more wheat flour. They don't know it's the wheat, but they know something is different - better.
 |
| Whole wheat bread with whipped butter and honey. Oh my! |
Lastly, if you think they won't eat it if they know you made it, tell it that you got it at the specialty bakery down the road. You did buy the ingredients at a store down the road with a bakery in it, right?
You will love that you are feeding your family so much better food.
And this is just the beginning ... :-)
Now, go bake and then come back and let me know what you thought.